Vulnerability Queue and Triage
10.1 Vulnerability Queue
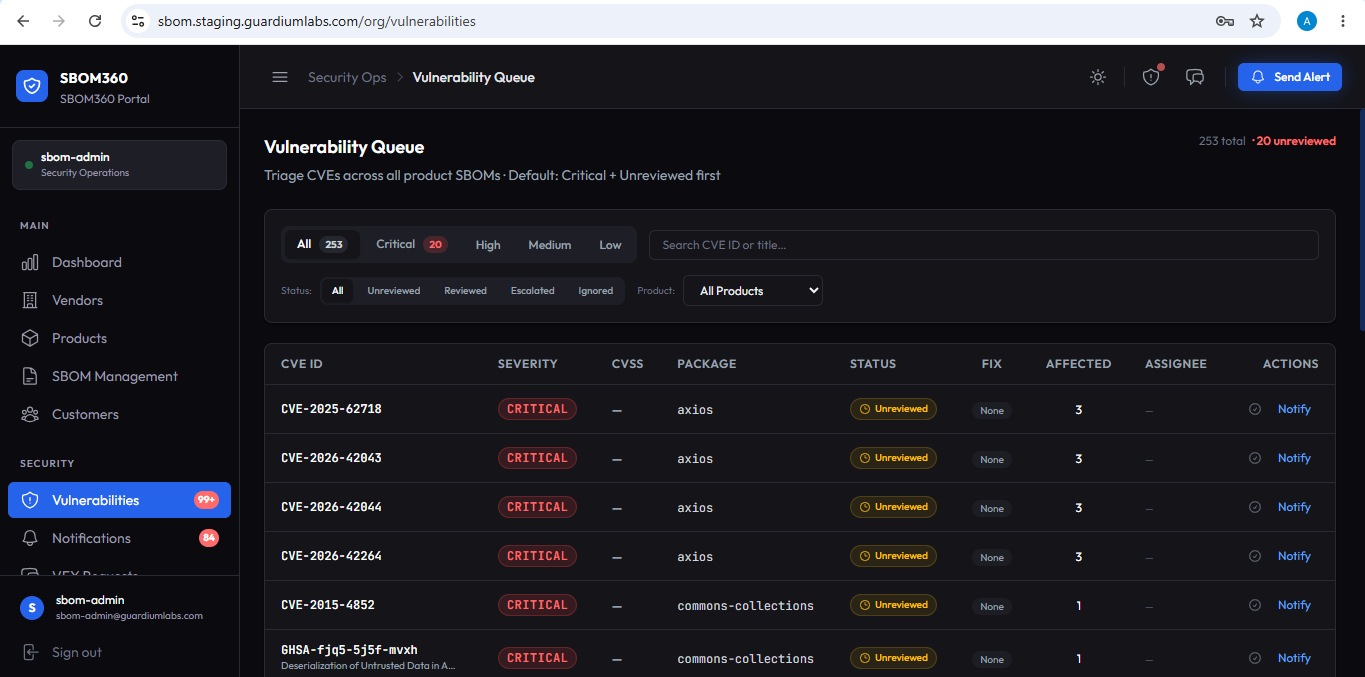
The Vulnerability Queue lists every CVE found across every linked product SBOM, defaulting to Critical and Unreviewed items first.
Filters
- Severity tabs — filter by Critical, High, Medium, Low, or All.
- Triage status filter — Unreviewed, Reviewed, or Escalated.
- Product filter — restrict the list to a single product.
- Search CVE ID or title, and Clear filters to reset everything.
Table columns
| Column | Description |
|---|---|
| CVE ID | The vulnerability identifier and, where available, its title. |
| Severity | Critical, High, Medium, or Low, colour-coded. |
| CVSS | The Common Vulnerability Scoring System score. |
| Package | The affected software component. |
| Status | Current triage status — Unreviewed, Reviewed, or Escalated. |
| Fix | Whether a fixed version is available. |
| Affected | How many product/SBOM instances are affected. |
| Assignee | The team member assigned to investigate, if any. |
Click the checkmark icon in the Actions column to quickly mark a vulnerability as reviewed, or click Notify to open the Send Alert modal pre-filled with that CVE.
10.2 Vulnerability detail page (CVE Detail)
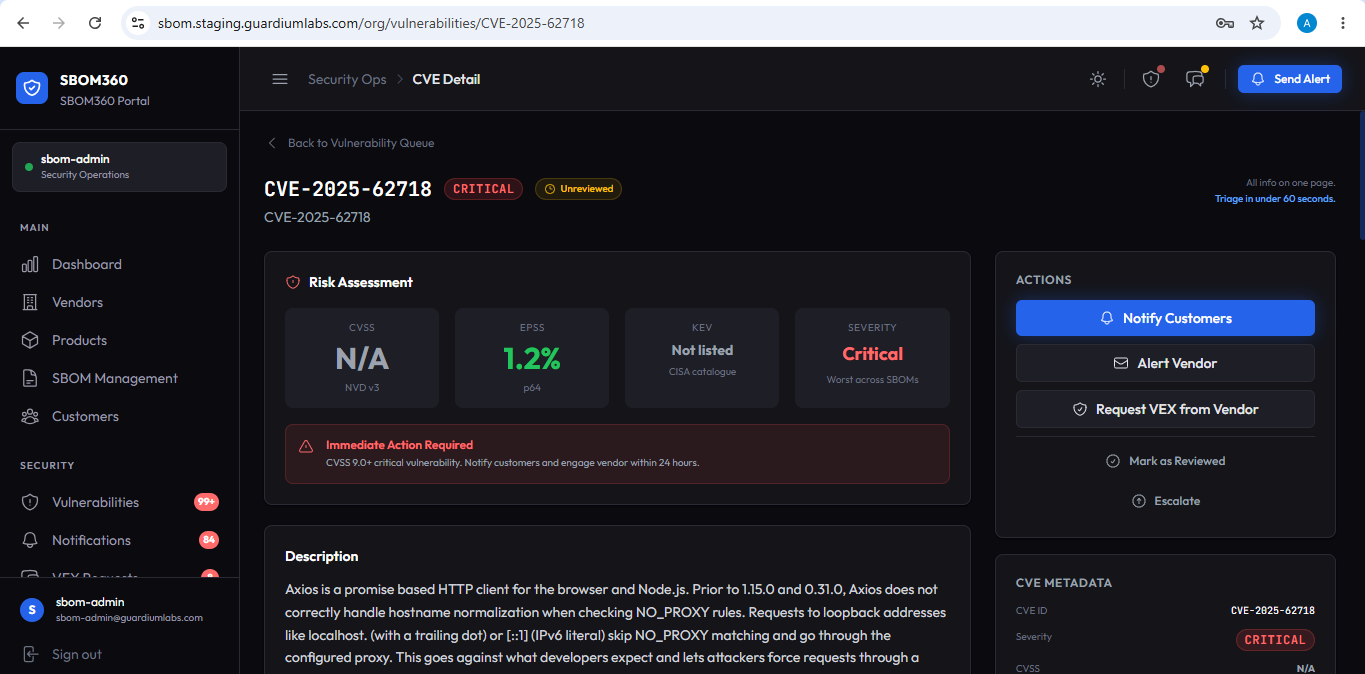
Opening a CVE shows everything needed to triage it in under a minute, on a single page.
Risk Assessment panel
Four scores at a glance: CVSS, EPSS (exploit prediction probability and percentile), whether the CVE is in the CISA Known Exploited Vulnerabilities (KEV) catalogue, and overall severity — plus a plain-language priority recommendation.
Description
The full vulnerability description, whether a fix is available, the publish date, and a link out to the NVD entry.
Affected parties
- Vendors — every vendor whose submitted SBOM contains this CVE.
- Affected Org Products — every internal product, SBOM, package, installed version, and fixed-in version.
- Affected Customer Deployments — every customer deployment of an affected product, with a link to that customer's detail page.
VEX Assessment
Shows any vendor VEX requests already tied to this CVE, and lets the organization create its own VEX Override — an internal assessment that differs from a vendor's, for example marking a CVE as a false positive for the organization's specific environment.
- VEX Status: choose Not Affected, Affected, Fixed, or Under Investigation.
- Justification: when marking Not Affected, choose from Component not present, Vulnerable code not present, Vulnerable code not in execute path, Cannot be controlled by adversary, Inline mitigations exist, or Other.
- Statement / Rationale: explain the assessment in free text.
- Apply VEX to future Trivy scans: toggle on to automatically suppress this finding as a false positive in future scans of this product.
- Create VEX Statement: save the override.
Assignment and due dates are not in this release
The Assignment & Due Date card is hidden on the CVE Detail page while the assignment workflow and ownership process are being finalised. Triage still works through the status actions below — Mark as Reviewed, Escalate and Reset to Unreviewed. Assignments recorded earlier are preserved and will reappear when the feature returns.
Actions panel
- Notify Customers — open the Send Alert modal for this CVE.
- Alert Vendor — request vulnerability information or a VEX statement from the responsible vendor.
- Create VEX Statement — jump to the VEX override form.
- Mark as Reviewed / Escalate / Reset to Unreviewed — update the triage status.
Tip
Use the CVE Metadata and Triage state cards in the right-hand column as a quick summary before you leave the page — they confirm the triage status and whether a VEX override is active.